Powershell is to Windows as Bash is to Linux…..ok not really, but kinda yes. Well yes, but actually no.
In this post, I’ll be going over the basic anatomy of a PowerShell command, aliases, the PS pipeline, and the all-important Get-Help cmdlet. This post assumes you have some prior programming knowledge and some experience with bash beforehand as it will be referenced quite a bit throughout the series.
Table of Contents
A Quick Intro to PowerShell
When we think of shells on a *nix system, we think of sh and bash in general. With windows, the equivalent shells would be dos and Powershell, dos being the shell we usually see when command prompt is opened and runs…you guessed it, MS-DOS commands (this is windows way of forcing a legacy shell on a modern OS). PowerShell is the other shell built into windows and is far more powerful than the dos shell, and a bit more complex as well. Compared to the dos shell, Powershell (which I will refer to as PS for the remainder of this series) is in a league of its own.
Ok…But Why Should I Care About PS?
I’m glad you asked! PowerShell is not only a powerful scripting language built into windows making it a great tool for living off the land (and considering windows is a massive chunk of the market, learning PS is great from an offensive security standpoint and by that logic a great tool for blue teamers too)and more than capable for general administrative tasks, this wonderful language is cross-platform as well (PS is Turing complete too!). Meaning not only do we have access to PS in windows, but we also have access to it in *nix environments as well (though it isn’t installed by default) and can do pretty much anything with it, the possibilities are endless! This is good news for us because now we have a powerful scripting language capable of running on both Windows and *nix machines.
Aside from PS having the capability to run on both *nix and Windows environments, it is also far more powerful than the dos shell on windows and offers a similar syntax to bash (for certain commands) courtesy of these wonderful built-in things called aliases.
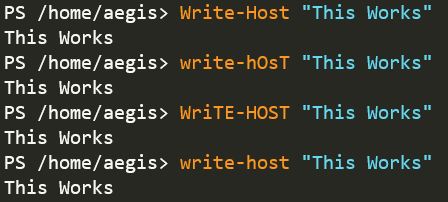
Powershell is a wonderfully forgiving language too, the syntax is very English and there are a number of ways to refer to a single PS command through aliases. PS is case insensitive too meaning we can do stuff like this.
The Anatomy of a PowerShell Command
As we’ve already established, PS is a rather verbose language. Much like any other shell PS has commands , or more formally known as cmdlets, and flags (or paramters). These cmdlets and their respective params are fairly verbose for the most part. We’ll take a look at the Get-ChildItem -Attribute Hidden, !Hidden cmdlet as an example.
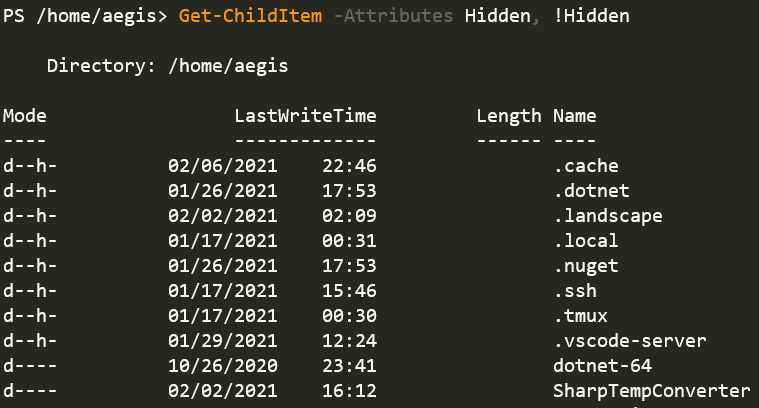
As we can see, there isn’t too much of a difference between how a command is run in PS and any other shell, we have the cmdlet (the base command) and then the flag to allow for more specific functions.
In this case, we are using the Get-ChildItem cmdlet and appending the -Attribute param which tells Get-ChildItem that we want to see files with hidden and non-hidden attribute. The equivalent of this in bash would be ls -al.
Verbs in PowerShell
Notice the verb in the cmdlet Get-ChildItem as PS likes to make great use of verbs in its cmdlets. Going back to the whole PS being verbose thing, cmdlets are quite literal with explaining their uses because of these verbs. We’ll take a look at a few common ones to get a general idea.
The Get Verb
The Get verb is used to retrieve some sort of data. In the case of the example previously used, Get-ChildItem is fetching the “ChildItem” object (more on this later), which would be the contents of the path specified. In the case that no path is specified, then it defaults to the current working directory. Another example of this verb would be Get-Content and would be the PS equivalent of cat in bash or type in dos. In line with the logic PS follows with its cmdlets, what can we assume this cmdlet does? You guessed it (maybe?), it gets the contents of the supplied parameter. Simple enough right? Let’s see this cmdlet in action.

As expected, the cmdlet did exactly what we expected it to do and it spit out the contents of the file idk.
A Brand New Verb
Yeah…I’m not apologizing for that header… The next verb we’ll look at is New (Ok this one isn’t actually a verb but it functions as one, this one goes out to all y’all grammar nazis). Applying the logic PS uses with verbs, we can assume this verb creates something. We can use the cmdlet New-Item to create a new item (or file, much like the touch command).
Set
The Set verb is used to assign a value to something. Let’s take a look at the Set-Variable cmdlet.

In this example, we are using the Set-Variable cmdlet (more on variables in the next part of this series) to create the variable sumvar and assigning the value "Is a variable" to it. We can see that the cmdlet did indeed create the variable with the correct value.
For a full list of the verbs at PS’s disposal, we can run Get-Verb. Keep in mind that depending on your PS version, there may be a few differences in the output of this cmdlet.
Aliases in PS
In general, an alias is a word or a sequence of characters (oh wait…that’s still a word) which can be used to reference a command. PS employs the use of these aliases to refer to a number of cmdlets. We’ll take a look at Set-Location cmdlet to showcase the power of aliases.
The alias cd (among a few others) points to the Set-Location cmdlet. Using the logic learned from a previous section, we can assume that this cmdlet…well, sets a location. If a location is not provided then the default value is the home path of the user running the cmdlet. (This cmdlet is also aliased to sl and chdir)
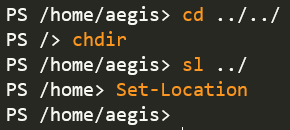
As we can see, all of the possible aliases of Set-Location function the same way as the referenced cmdlet as is expected.
For a full list of all the aliases at PS’s disposal by default, we can run the command Get-Alias ( keep in mind that different versions of PS may have different outputs of this command, much like Get-Verb).
Should you decide that you want to set your own alias, this can be done using the Set-Alias cmdlet though it will only last for that PS session. To make a custom alias persistent across PS sessions, you’ll have to add the alias to the profile.ps1 file (which should be stored in $PSHOME, as this location taked precedence over the rest. More on PS file extensions in the next section of this series). This profile.ps1 file runs every time a new PS session is initiated (should the file exist), meaning an alias defined in this file is going to be run in every new PS session. More on PS profiles here.
The PS Pipeline
The pipeline is a powerful feature built into PS that shares some similarities with pipes used in bash, though there is one big difference between the two. Whereas a bash command would return a string (stdio) which will then be passed down the pipeline, a PS pipeline takes complete objects and sends them down the stream. Let’s take a look at both pipelines to make sense of that last statement. We’ll start with the bash pipeline.
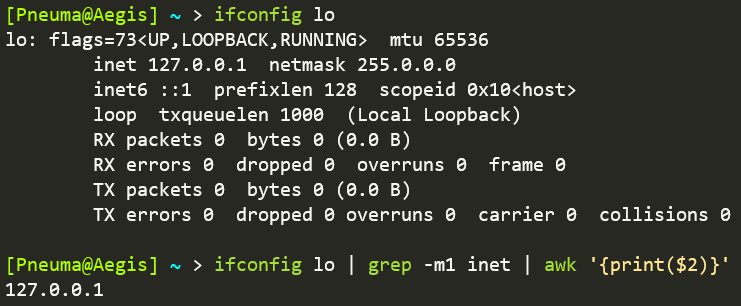
As we can see, we are extracting the value of the inet field from the output of ifconfig lo, which returns its output as a string (this is important for discerning the difference between the bash and PS pipelines). We’re then taking the string output of ifconfig lo and piping it through a series of commands, further filtering the string output. So from the entire output we grep out the first matching instance of the word “inet” and then pipe that line to awk and return only the second field from that line. This is a very basic example but the important takeaway from this is that we are passing the output as a string throughout the pipeline.
Now we’ll take a look at the PS pipeline. Where bash outputs as a string (ok actually stdout if you want to get technical but this stdout is a string), PS outputs complete objects. What this basically means is what is output by one cmdlet is what will be passed down the pipe and be received by the following cmdlet. This isn’t exactly the same as bash as stdio being passed around can get mangled along the way. This won’t happen with PS since the output is an object and not a string. That’s enough talk about output, let’s take a look at what a PS pipeline would look like.
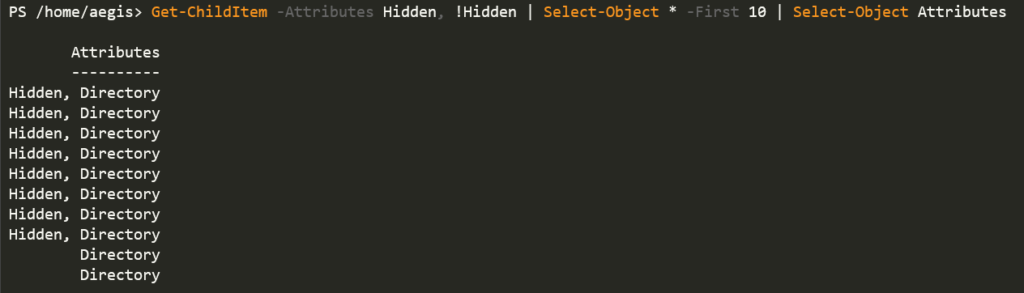
Here we are using the PS pipeline to list the attributes of the first 10 listings in the current directory. We can see that the first directories are hidden, but where is PS getting these values from if they aren’t being passed as strings? To answer this question, let’s take look at the first two chunks of this pipeline.
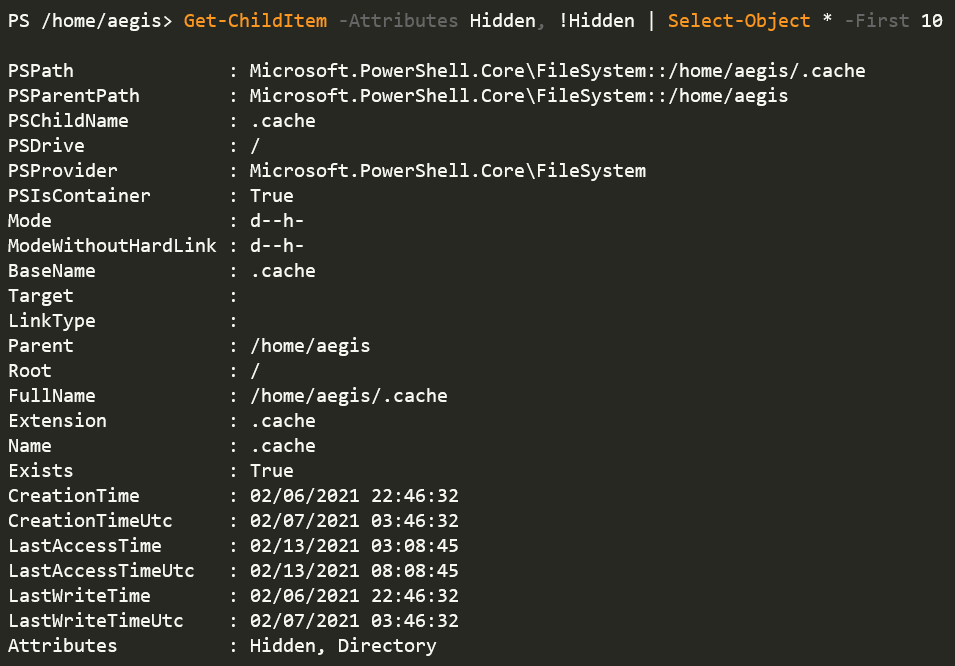
Looking at the output of the first listing, we can view the all the objects that make up the properties of the .cache directory and all the way at the bottom we can see this it is both a directory and has the Hidden attribute added to it. By messing around with the Select-Object in the last chuck of this pipeline, we can query different bits of info about the .cache directory.
To close off this section, I’d like to demonstrate how easy it is to kill a process using the PS pipeline just because it’s awesome.
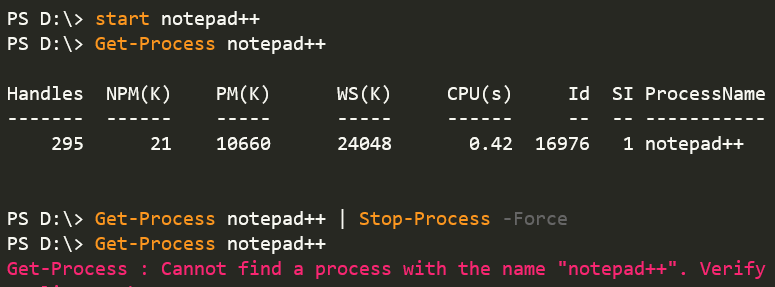
And that’s it! We can see that the notepad++ process no longer exists as PS throws an error telling us the process wasn’t found (now try it using a bash pipeline and tell me it was easier than this).
PS Manuals
Just like bash has man to provide a manual for the specified command, the equivalent of this in PowerShell is Get-Help.
Get-Help prints out the help page for a specified cmdlet in varying levels ranging from a quick explanation with the syntax to pages of detailed inner workings of the cmdlet, examples, a listing of all parameters, and a link to the online docs. The levels of detail for Get-Help are as follow:

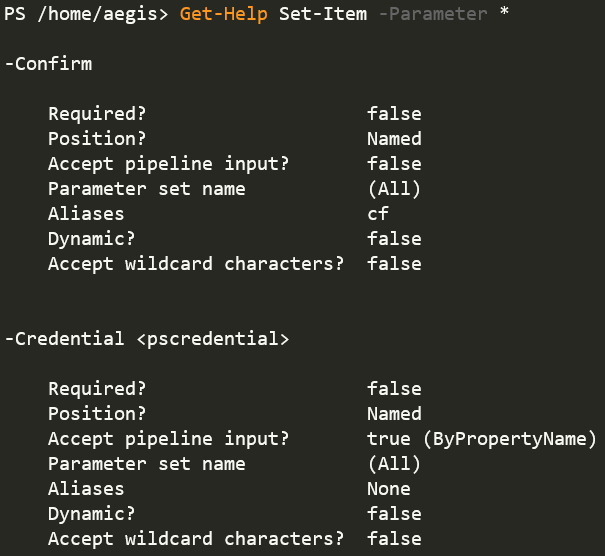
To view all the potential parameters for a given cmdlet, we can use Get-Help [cmdlet] -Parameter * like so.
It may be a good idea to update them and make sure they are up to date from time to time. We can do this by using the Update-Help cmdlet (this cmdlet requires admin access so you’ll have to run as administrator so it doesn’t throw any errors).
Ending Note
This is by no means an end all be all, this is merely an introduction to PowerShell and I do not know all there is to know about PS by any means. I hope this has sparked an interest (hopefully you have if you’ve gotten to this point) and you decide to do some further research into PS.